In my last post on Zappa, I covered adding it to your existing Django app, but left it using SQLite as a database (which fails). In this post, we’ll modify the setup to use RDS secured in a VPC to persist data.
Creating a VPC
First, we’ll need a VPC that fits the requirements for RDS (spanning two availability zones) and Lambda (internet access). Here’s the shortlist:
- Subnets in two availability zones
- Routes and ACLs to allow traffic out of the VPC
- Internet accessibility either with a NAT instance or EC2 NAT Gateway
- Security group for Lambda functions to run in
- Security group that allows Lambda group database access
- An RDS instance (ideally a cheap one)
Andreas and Michael Wittig from cloudonaut.io have provided an example template that covers the first two requirements, available on their site. It’s not a brief template, so I won’t post it in full here. Their template is released under Apache 2.0, the same license as all other code on this blog.
To start, we’ll add the parameters that will be needed later when creating our
database: DBUser and DBPassword. They won’t be used until we add the RDS
instance to the template which will have to be last, as it depends on all the
security groups we’re going to add.
"Parameters": {
        "DBUser": {
            "Description": "User for RDS",
            "Type": "String",
            "Default": "django"
        },
        "DBPassword": {
            "Description": "Password for RDS database",
            "Type": "String",
            "MinLength": "12",
            "Default": "1qaz2wsx3edc"
        },
        "ClassB": {
            "Description": "Class B of VPC (10.XXX.0.0/16)",
            "Type": "String",
            "MinLength": "1",
            "MaxLength": "3",
            "Default": "10"
        }
    },
1qaz2wsx3edc is a terrible password (if you use qwerty, type it
and you’ll see why) so make sure you override it when deploying RDS. Lambda
always requires internet access to run inside a VPC, even if you don’t
directly make external service calls. To allow this, we’ll add a NAT Gateway
for each availability zone.
Note: Technically we could use a single NAT Gateway for both availability zones, but that would mean a failure in either AZ would make our app unavailable.
Each gateway needs its own Elastic IP Address, so we’ll have to define those as well. This change is in commit c8043 in the project repo, and you can run a stack update once you’ve added this to start the NAT Gateways creating - for me it took a few minutes for them to be ready.
"NatEIPA": {
    "DependsOn": ["VPCGatewayAttachment"],
    "Type": "AWS::EC2::EIP",
    "Properties": {
        "Domain": "vpc"
    }
},
"NatEIPB": {
    "DependsOn": ["VPCGatewayAttachment"],
    "Type": "AWS::EC2::EIP",
    "Properties": {
        "Domain": "vpc"
    }
},
"NatGatewayA": {
    "DependsOn": ["VPCGatewayAttachment"],
    "Type": "AWS::EC2::NatGateway",
    "Properties": {
        "AllocationId": {"Fn::GetAtt": ["NatEIPA", "AllocationId"]},
        "SubnetId": {"Ref": "SubnetAPublic"}
    }
},
"NatGatewayB": {
    "DependsOn": ["VPCGatewayAttachment"],
    "Type": "AWS::EC2::NatGateway",
    "Properties": {
        "AllocationId": {"Fn::GetAtt": ["NatEIPB", "AllocationId"]},
        "SubnetId": {"Ref": "SubnetBPublic"}
    }
},
With the NAT Gateways configured, now we need to change the route tables in our private subnets to use them by default. Without these routes, when the Lambda functions start up in the VPC they’ll just fail immediately.
The AWS::EC2::Route resource recently added support for NAT Gateways,
so we can use NatGatewayId with a Ref from the Gateway resources we defined
earlier. See commit 2ffb5 for the exact diff.
"RouteTablePrivateA": {
    "Type": "AWS::EC2::RouteTable",
    "Properties": {
        "VpcId": {"Ref": "VPC"},
        "Tags": [{
            "Key": "Name",
            "Value": "Private"
        }]
    }
},
"RouteTablePrivateB": {
    "Type": "AWS::EC2::RouteTable",
    "Properties": {
        "VpcId": {"Ref": "VPC"},
        "Tags": [{
            "Key": "Name",
            "Value": "Private"
        }]
    }
},
"RouteTableAssociationAPrivate": {
    "Type": "AWS::EC2::SubnetRouteTableAssociation",
    "Properties": {
        "SubnetId": {"Ref": "SubnetAPrivate"},
        "RouteTableId": {"Ref": "RouteTablePrivateA"}
    }
},
"RouteTableAssociationBPrivate": {
    "Type": "AWS::EC2::SubnetRouteTableAssociation",
    "Properties": {
        "SubnetId": {"Ref": "SubnetBPrivate"},
        "RouteTableId": {"Ref": "RouteTablePrivateB"}
    }
},
"RouteTablePrivateNatGatewayA": {
    "Type": "AWS::EC2::Route",
    "DependsOn": "VPCGatewayAttachment",
    "Properties": {
        "RouteTableId": {"Ref": "RouteTablePrivateA"},
        "DestinationCidrBlock": "0.0.0.0/0",
        "NatGatewayId": {"Ref": "NatGatewayA"}
    }
},
"RouteTablePrivateNatGatewayB": {
    "Type": "AWS::EC2::Route",
    "DependsOn": "VPCGatewayAttachment",
    "Properties": {
        "RouteTableId": {"Ref": "RouteTablePrivateB"},
        "DestinationCidrBlock": "0.0.0.0/0",
        "NatGatewayId": {"Ref": "NatGatewayB"}
    }
},
With that, we’re actually done setting up the network - internet access will work in the public subnets via internet gateway, and private subnets via the NAT Gateways we configured. We’re ready to configure the database.
Adding RDS
Running RDS in a VPC requires that you provide a group of a least 2 subnets, because the support for multi-AZ replication/failover requires that at least two availability zones are available for RDS to use. In CloudFormation, the group is a separate resource defined as a list of subnet ID’s. This change is in 32ad445.
"DbSubnetGroup": {
    "Type" : "AWS::RDS::DBSubnetGroup",
    "Properties": {
        "DBSubnetGroupDescription": "Subnets for RDS db instance",
        "SubnetIds": [{"Ref": "SubnetAPrivate"}, {"Ref": "SubnetBPrivate"}]
    }
},
We’ll also need two security groups - one for Lambda to execute in, and one to allow ingress from the Lambda group to the database. This change is in cb0f79.
"DBSecurityGroup": {
    "Type": "AWS::EC2::SecurityGroup",
    "Properties" : {
        "GroupDescription": "Open database for access",
        "VpcId": {"Ref": "VPC"},
        "SecurityGroupIngress" : [{
            "IpProtocol" : "tcp",
            "FromPort" : "3306",
            "ToPort" : "3306",
            "SourceSecurityGroupId" : { "Ref" : "LambdaExecSecurityGroup" }
        }]
    }
},
"LambdaExecSecurityGroup": {
    "Type": "AWS::EC2::SecurityGroup",
    "Properties" : {
        "GroupDescription": "Lambda functions execute with this group",
        "VpcId": {"Ref": "VPC"}
    }
},
Now we’re set to make the database - I turned off multi-AZ redundancy because
it costs more and I didn’t need it for this demo, but if you were serving
production traffic you’d want to turn it on (and probably use a better database
than a t2.micro). This change is in 7f643f1.
"DBInstance" : {
    "Type": "AWS::RDS::DBInstance",
    "Properties": {
        "DBName"            : "djangohellodb",
        "Engine"            : "MySQL",
        "MultiAZ"           : false,
        "MasterUsername"    : { "Ref" : "DBUser" },
        "DBInstanceClass"   : "db.t2.micro",
        "AllocatedStorage"  : 5,
        "MasterUserPassword": { "Ref" : "DBPassword" },
        "VPCSecurityGroups" : [{"Fn::GetAtt": ["DBSecurityGroup", "GroupId"]}],
        "DBSubnetGroupName" : {"Ref": "DbSubnetGroup"}
    }
},
Now we have the full template, create it on your infrastructure
 to spin up a copy. You can view the full template on Github as
well. It’ll take 15 minutes or so, and you can continue the tutorial while it’s
working.
Adding IAM Permissions
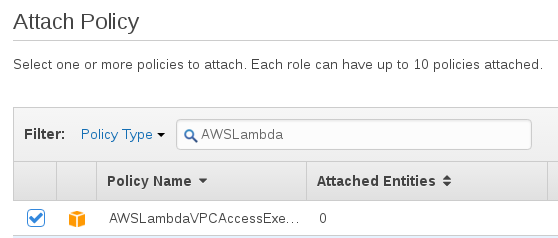
On the IAM role for the Lambda function, you’ll have to add
AWSLambdaVPCAccessExecutionRole to allow the function to run inside your VPC.
Go to the IAM Roles console, and find the ZappaLambdaExecution role. Click on
“Attach Policy” and search for AWSLambda.

This policy provides the Lambda service some permissions to manage network interfaces, which it needs to make a connection between the servers (managed by AWS) where Lambda runs and the VPC we’re putting the database in.
Moving a Lambda Function Inside a VPC
If you’ve been burned by creating an RDS instance in the wrong VPC before, then needing to snapshot and rehydrate it in the right subnet group, you’ll appreciate that the Lambda execution VPC can be changed at any time. (!!!) Since there isn’t a persistent instance, network or tenancy changes aren’t even a big deal.
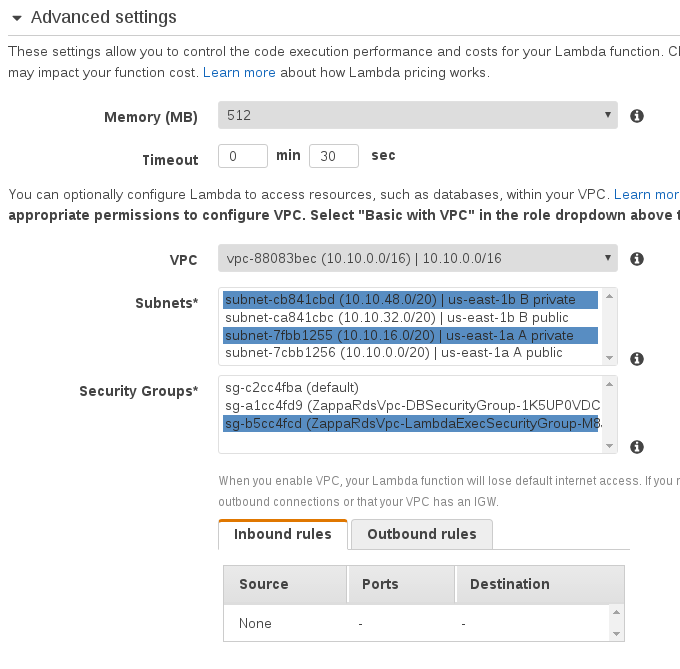
In the Lambda console and find the function that Django-Zappa deployed,
probably named django-zappa-example-testing and go to the configuration tab.
Under “Advanced” you’ll find VPC settings. CloudFormation will have named the
new VPC “10.10.0.0/16” unless you specified a different ClassB parameter in
the template.

Select both private subnets, and the security group with “LambdaExecSecurityGroup” in its name. Then hit “Save” at the top of the page and go back to your API Gateway URL. If you don’t have it handy, the API Gateway dashboard has the URL at the top.
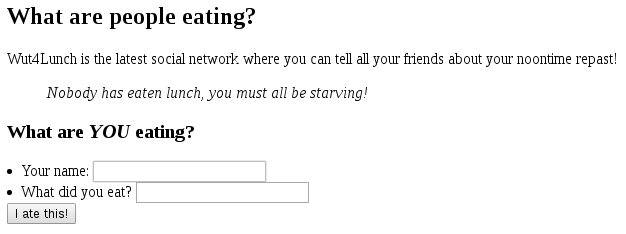
Since we haven’t made any code changes or updated our deployment, going to the page should look exactly like before - except that the underlying function is running in the VPC, one step closer to a working database.
Under the hood, when executing in a VPC the Lambda service creates a network interface and sends all traffic from your function through it. That’s why you need to have NAT Gateway or another internet access path available.
Database Setup
To use MySQL, you’ll need to add MySQL-python to the requirements.txt file
and pip install -r requirements.txt to download it. Then we’ll need to create
the database on the RDS instance. You have a few options for doing this - the
easiest is to take the SQLdump from the repository and apply it to RDS from an
EC2 instance that’s inside your VPC.
First, you’ll need to get the connection information for the MySQL we provisioned in CloudFormation. Check the stack outputs (you may need to scroll a bit).

One way to get connected without doing much work is to create an EC2 instance to run the SQL commands to create tables from. You could also use a VPN to get inside the VPC. I chose the EC2 instance route, and put an SSH security group in the template for convenience.
On an Amazon Linux instance, run these commands:
$ sudo yum install -y mysql
$ curl -L -v -s https://raw.githubusercontent.com/ryansb/django-zappa-example/master/dbdump.sql |
   mysql -u django -p1qaz2wsx3edc -D djangohellodb --port 3306 \
   --host zde95ilidabtaj.cpduqtjksm3w.us-east-1.rds.amazonaws.com
Now open hello_django/settings.py and replace the DATABASES dictionary to
stop using SQLite and connect to RDS.
DATABASES = {
    'default': {
        'ENGINE': 'django.db.backends.mysql',
        'NAME': 'djangohellodb',
        'USER': 'django',
        'PASSWORD': '1qaz2wsx3edc',
        'HOST': 'zde95ilidabtaj.cpduqtjksm3w.us-east-1.rds.amazonaws.com',
        'PORT': '3306',
    }
}
Redeploying
Now it’s time to redeploy our changes to the test environment.
 $ ./manage.py update testing
Packaging project as zip....
Uploading zip (15.3MiB)...
Your updated Zappa deployment is live!
Back in the browser, refreshing the page should work and you’ll see the sample data from SQLite is gone.

Now go ahead and enter a few lunches - you’ll see that they persist correctly (great) and that the function is still fast after warmup (super great).
Note: Lambda creates network interfaces in your VPC. Before you can delete the stack you must detach (and delete) them because they depend on your VPC.
Wrapping Up
To recap, we’ve covered:
- Moving Lambda functions to a VPC
- Using CloudFormation to build a VPC and associated security groups
- Deploying Django on Lambda
- How Lambda attaches to your VPC
Get the updated project on the rds-db repo branch and check out
Django-Zappa on Github. Keep up with future posts via RSS. If you have suggestions, questions, or comments
feel free to email me, ryan@serverlesscode.com
.